When the temperature rises during peak cooking hours, the kitchen often becomes the most uncomfortable room in the house. While many homeowners focus on ventilation hoods for heat extraction, the ambient temperature and stagnant air remain a persistent challenge. Integrating a ceiling fan can significantly improve comfort, but it requires a careful approach to placement, scale, and material selection to ensure it functions safely and effectively without creating unwanted turbulence.
Asking whether you can put a ceiling fan in a kitchen is a common design dilemma. The answer is a definitive yes, provided you account for the unique environmental factors of a food preparation space. By focusing on the specific layout of your island, range, and traffic paths, you can create a more inviting environment that balances functional cooling with the aesthetic demands of a high-traffic hub.
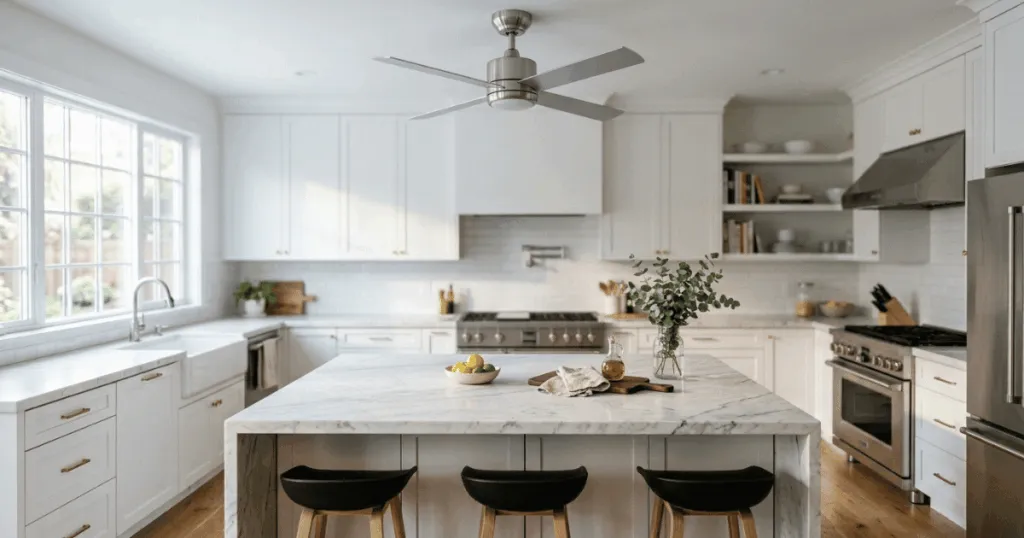
Space Assessment and Kitchen Constraints
Before selecting a model, you must evaluate the physical constraints of your kitchen. Unlike a bedroom or living room, the kitchen is a workspace defined by vertical obstructions and specific safety zones. Start by measuring your ceiling height; a standard 8-foot ceiling generally requires a flush-mount or low-profile fan to maintain the mandatory 7-foot clearance from the floor to the blades. If your ceiling is higher, a downrod mount is usually preferred to bring the fan closer to the living zone for better airflow efficiency.
Next, consider the proximity to your cooking surface. You must never install a ceiling fan directly above a gas range or a high-heat cooktop. The fan can pull heat away from the stove, causing uneven cooking or, in extreme cases, creating a fire hazard by drawing flames toward the blades. A safe distance is typically at least 3 to 4 feet away from the range, depending on the power of your ventilation hood. If your kitchen layout is compact, prioritize the fan placement over the island or the primary prep area rather than the cooking zone.
Finally, assess the existing electrical infrastructure. Kitchens often have complex lighting schemes, including recessed cans, pendant lights, and under-cabinet strips. A ceiling fan can easily create a “strobe effect” if it is placed too close to a light source, where the rotating blades intersect the light beams. Map out your lighting plan to ensure the fan does not interfere with your primary task lighting or create distracting shadows on your countertops.
Strategic Layout and Placement Ideas
Effective kitchen cooling relies on strategic placement that promotes air circulation without disrupting the cooking process. The goal is to move air across the room to prevent hot spots, especially near ovens or windows that receive direct afternoon sun. If you have a large kitchen island, centering the fan directly over the island is often the most logical choice. This keeps the fan away from the cooking perimeter while providing a steady breeze for those sitting at the island or prepping food.
For galley kitchens or narrow layouts, a single, smaller-diameter fan placed in the center of the walkway is usually sufficient. Avoid oversized blades that might make the space feel cramped or visually cluttered. A fan with a 44-inch to 52-inch span is typically the sweet spot for most residential kitchens, providing enough air movement without overwhelming the ceiling plane. If your kitchen is open to a dining area, consider a dual-fan approach or a single, larger fan positioned at the junction of the two spaces to bridge the airflow.
Consider the blade profile and material carefully. In a kitchen, you want to avoid intricate carvings or fabric blades that trap grease and dust. Sleek, minimalist designs with three or four blades are easier to wipe down and offer a cleaner look that complements modern cabinetry. If your kitchen features a rustic or farmhouse aesthetic, look for metal or high-quality composite blades that can withstand the occasional humidity spike without warping or degrading over time.
Think about the fan’s visibility from adjacent rooms. Since the kitchen is often visible from the living or dining area, the fan should harmonize with your existing finishes. If you have brushed nickel hardware on your cabinets, a matching or matte black finish on the fan can tie the space together. Avoid overly decorative fans that draw too much attention; the fan should function as a subtle, integrated element of the ceiling design rather than a focal point.
Maintenance, Traffic, and Safety Considerations
Kitchens are inherently greasy environments. Even with a high-quality range hood, microscopic grease particles will eventually settle on the ceiling fan blades. This makes maintenance a primary concern. Choose a fan with smooth surfaces that are easy to access with a microfiber cloth or a long-handled duster. If the blades are difficult to clean, you will likely neglect them, leading to dust buildup that can become unsightly and potentially unhygienic over time.
Safety extends beyond fire hazards and clearance. Ensure the fan is securely mounted to a fan-rated junction box. Standard light fixture boxes are not designed to handle the torque and vibration of a ceiling fan. If you are retrofitting an older kitchen, verify that the existing box is braced properly to support the weight and motion of the unit. This is non-negotiable for preventing long-term structural issues or noise problems.
Traffic flow is another practical consideration. In a busy kitchen, people are constantly moving between the fridge, sink, and stove. Ensure the fan is positioned so that no one feels the need to dodge the blades while carrying hot pots or sharp knives. If your kitchen has a high-traffic island, ensure the fan is high enough that it does not create a “chopping” sensation for taller family members. When in doubt, err on the side of a higher mount or a smaller blade span to maintain a clear, comfortable environment.
Common Styling Mistakes and Fixes
A common mistake is choosing a fan that is too large for the room, which can make a kitchen feel claustrophobic. If your kitchen is under 100 square feet, a large fan will dominate the ceiling and create excessive wind that might cool your food too quickly or blow papers off the counter. Opt for a compact, high-velocity fan instead. Conversely, don’t choose a fan that is too small; it will struggle to move air effectively, leaving you with a noisy motor that provides little comfort.
Another frequent error is ignoring the color temperature of the fan’s light kit. If your kitchen uses warm, 2700K lighting, a fan with a cool, 5000K LED light will look jarring and out of place. Always match the light output of your fan to the existing lighting in the room. If you don’t need a light kit, consider a fan without one to keep the ceiling profile as low and unobtrusive as possible, especially if you already have ample recessed lighting.
Finally, avoid the temptation to install a fan with too many blades. While more blades can look decorative, they often increase drag and noise without significantly improving airflow. A three-blade design is often more efficient and visually streamlined for a kitchen setting. By focusing on clean lines and functional performance, you can incorporate a ceiling fan that enhances your kitchen’s comfort without compromising its design integrity.
Optimizing Airflow Dynamics in Culinary Spaces
When integrating a ceiling fan into a kitchen, understanding the physics of air movement is vital. Kitchens are often filled with obstacles—cabinets, hanging pots, and tall appliances—that can disrupt standard airflow patterns. To maximize the effectiveness of your fan, ensure the blades are pitched correctly. A blade pitch of 12 to 15 degrees is generally ideal for moving a significant volume of air at lower speeds, which is perfect for a kitchen where you want a gentle breeze rather than a wind tunnel effect. High-velocity, low-pitch fans might create too much turbulence, potentially cooling hot dishes too rapidly or blowing lightweight items off your prep surfaces.
Consider the direction of the blade rotation as well. Most modern fans feature a reversible motor. During the summer months, the fan should rotate counter-clockwise to push air downward, creating a wind-chill effect that makes the room feel cooler. In the winter, reversing the fan to a clockwise rotation at a low speed can help circulate warm air that has risen to the ceiling, pushing it back down the walls and into the living space. This is particularly useful in open-concept kitchens where heat often gets trapped near the ceiling.
Furthermore, evaluate the motor quality. Kitchens are often used for extended periods, especially during meal preparation or entertaining. A high-quality DC motor is often quieter and more energy-efficient than a standard AC motor. Because kitchens are social hubs, noise sensitivity is a real factor. A silent motor ensures that the fan provides comfort without interfering with conversation or the ambient noise of the kitchen environment. When researching, look for models that emphasize “whisper-quiet” operation to maintain the tranquility of your home.
Integrating Fans with Kitchen Lighting Design
Lighting is the backbone of a functional kitchen. When you add a ceiling fan, you are essentially adding a new light source to the room. If your kitchen relies on a mix of task lighting and ambient lighting, the fan’s light kit should be chosen to complement, not compete with, these existing layers. If you already have sufficient recessed lighting, consider a fan without a light kit to maintain a sleek, unobtrusive ceiling profile. This prevents the “cluttered ceiling” look that often happens when too many fixtures are competing for attention.
If you do opt for a light kit, prioritize dimmable LED options. Dimmability allows you to transition the kitchen from a bright, high-energy workspace during food prep to a softer, more relaxed environment for dining or evening socializing. Ensure the light kit is compatible with your existing smart home or wall-switch dimmers to avoid flickering or buzzing, which are common issues when mismatched components are used. The goal is a seamless integration where the fan feels like a natural extension of the kitchen’s architecture rather than an afterthought.
Long-Term Durability and Material Selection
The kitchen environment is significantly more demanding than a bedroom or office. Beyond grease, you have to contend with fluctuating humidity levels from boiling water, dishwashers, and ovens. This is why material selection is non-negotiable. Avoid wood blades, even if they are finished, as they can eventually absorb moisture and warp, leading to an unbalanced fan that wobbles and creates noise. Instead, opt for high-grade ABS plastic or powder-coated metal blades. These materials are inherently resistant to moisture and are much easier to clean.
Consider the finish of the fan housing as well. A matte finish is generally more forgiving in a kitchen than a high-gloss finish, as it shows fewer fingerprints and dust particles. If your kitchen features stainless steel appliances, a brushed nickel or chrome fan can provide a cohesive look. If you have a more modern or industrial kitchen, a matte black or bronze finish can add a sophisticated touch. By selecting durable, low-maintenance materials, you ensure that your investment remains functional and aesthetically pleasing for years to come, regardless of the daily rigors of kitchen life.
FAQ
Can you put a ceiling fan directly over a kitchen stove?
No, you should never install a ceiling fan directly over a gas range or high-heat cooktop. The fan can pull heat away from the stove, causing uneven cooking, and potentially draw flames toward the blades, creating a significant fire hazard.
What is the best blade material for a kitchen ceiling fan?
The best materials for kitchen ceiling fans are smooth, non-porous options like metal or high-quality composite. These materials are resistant to the grease and humidity common in kitchens and are much easier to clean than wood or fabric blades.
How much clearance do I need for a kitchen ceiling fan?
You must maintain a minimum of 7 feet of clearance between the floor and the fan blades for safety. In kitchens with standard 8-foot ceilings, this usually necessitates the use of a flush-mount or low-profile fan model.
Will a ceiling fan interfere with my kitchen range hood?
It can if placed too close. A ceiling fan should be at least 3 to 4 feet away from your range hood to ensure it does not disrupt the hood’s ability to extract smoke and grease, while also preventing the fan from pulling heat toward the blades.